
You can build, run, and debug Logic Apps Standard locally in Visual Studio Code. In this walkthrough, we'll install the extension, create a stateful workflow, send it a request from Postman, and pause execution at a breakpoint. The example uses built-in operations and local storage emulation, with no deployment to Azure.
I've worked with Logic Apps for over ten years. In my earlier setup videos, installing the extension took much longer. The installation shown here handles the development dependencies for you.
What runs locally in this example
Our workflow receives an HTTP request, adds a short text prefix, and sends a response to the caller. It has one trigger and three actions, all built in. The Logic Apps Standard runtime and Azurite storage emulators run on your computer.
This example doesn't deploy an Azure resource or call a managed connector. Adding Azure-hosted managed connectors or cloud services changes the setup and can introduce charges. A built-in connector can also call a paid external service, so choose operations based on what they actually do.
In Standard, one logic app can contain multiple workflows. The logic app project is the unit you deploy, so group related workflows together. Consumption uses a different hosting model, with one workflow per logic app resource.
Install the Logic Apps Standard extension
Start with Visual Studio Code and an HTTP client. I use Postman in the recording. You also need internet access to download the extension and its dependencies.
- Open Extensions in VS Code and search for Azure Logic Apps (Standard).
- Select the Microsoft extension and choose Install. Make sure you're selecting Standard for this local runtime walkthrough.
- Let the dependency installation finish, then reload or restart VS Code.
The Microsoft extension manages the required development dependencies. Microsoft's current setup guide lists Azure Functions Core Tools, the .NET SDK, and Node.js. In my recording, the installed extensions and status bar also show Azure tools, C# support, and Azurite services. Let installation complete before creating the project; the time will vary by machine.
For a workflow using only local built-in operations, Microsoft's guide does not require an Azure subscription. I encountered a Microsoft sign-in prompt during the demo and signed in, but did not select a subscription or resource group. That prompt is separate from enabling managed connectors in Azure.
Create a workspace and stateful workflow
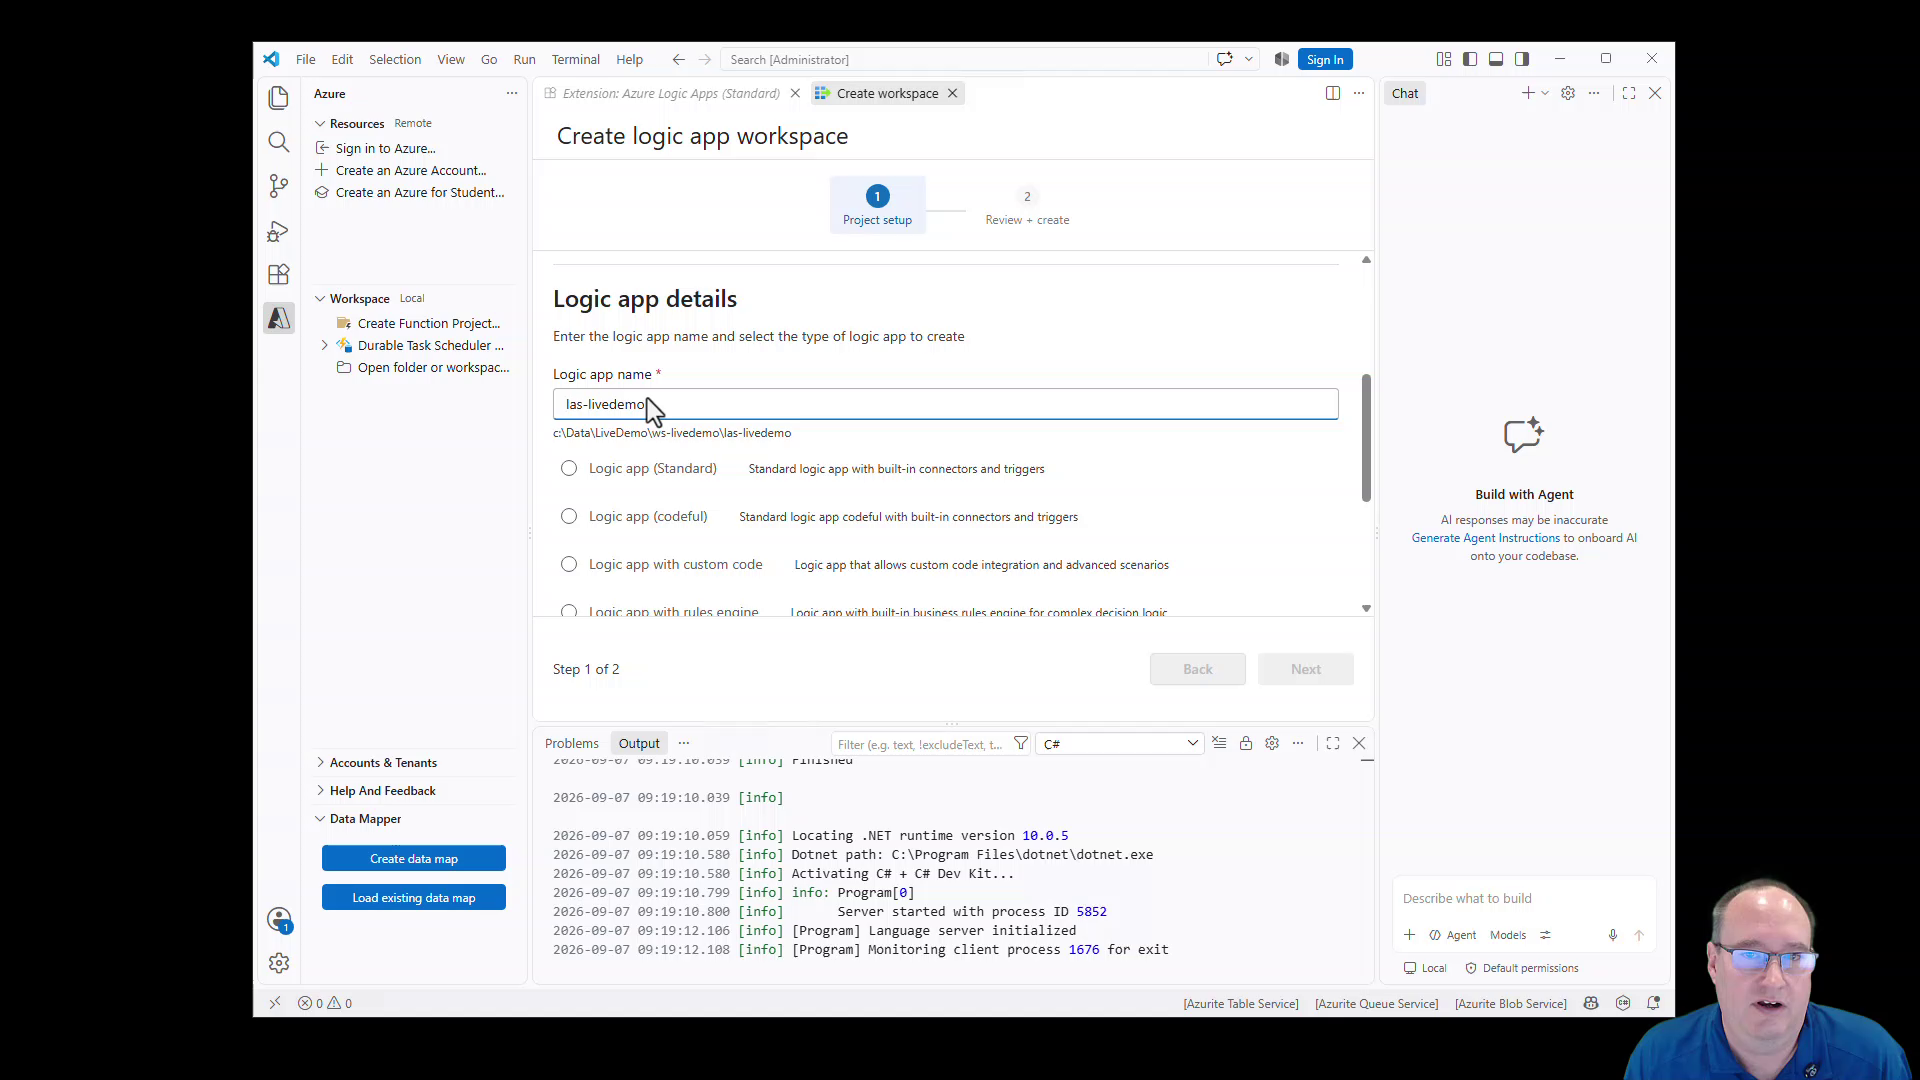
Open the Azure pane. Under Workspace, select the Logic Apps icon and choose Create new logic app workspace. The wizard in the video collects these values:
- Workspace parent folder: a local folder for your files.
- Workspace name:
ws-livedemo. - Logic app name:
las-livedemo. - Logic app type: Logic app (Standard).
- Workflow name:
liveworkflow. - Workflow type: Stateful.
Select Next, review the values, and choose Create workspace. These example names are optional; use names that describe your own project.
The generated project contains a liveworkflow folder with its own workflow.json. Right-click that file and choose Open Designer. When asked whether to use connectors from Azure, choose Skip for now for this example.
I use the classic designer in the recording. If your installed version presents a newer designer, some controls may look different; the trigger and actions below are the same ones to find.
Build the request-and-response workflow
Add the following operations in order:
- When an HTTP request is received: add this built-in Request trigger. We'll send a plain-text request body.
- Initialize variable: create a string variable named
NewText. Set its value toThe input was, including the trailing space. - Compose: rename the action to Compose - Response. In Inputs, insert the
NewTextvariable followed immediately by the Request trigger's Body using dynamic content. - Response: use status code
200. For Body, select Outputs from Compose - Response.
The lightning-bolt control opens dynamic content from earlier operations. The fx control opens expressions for tasks such as string manipulation and conversions. This example only needs the variable and request body.
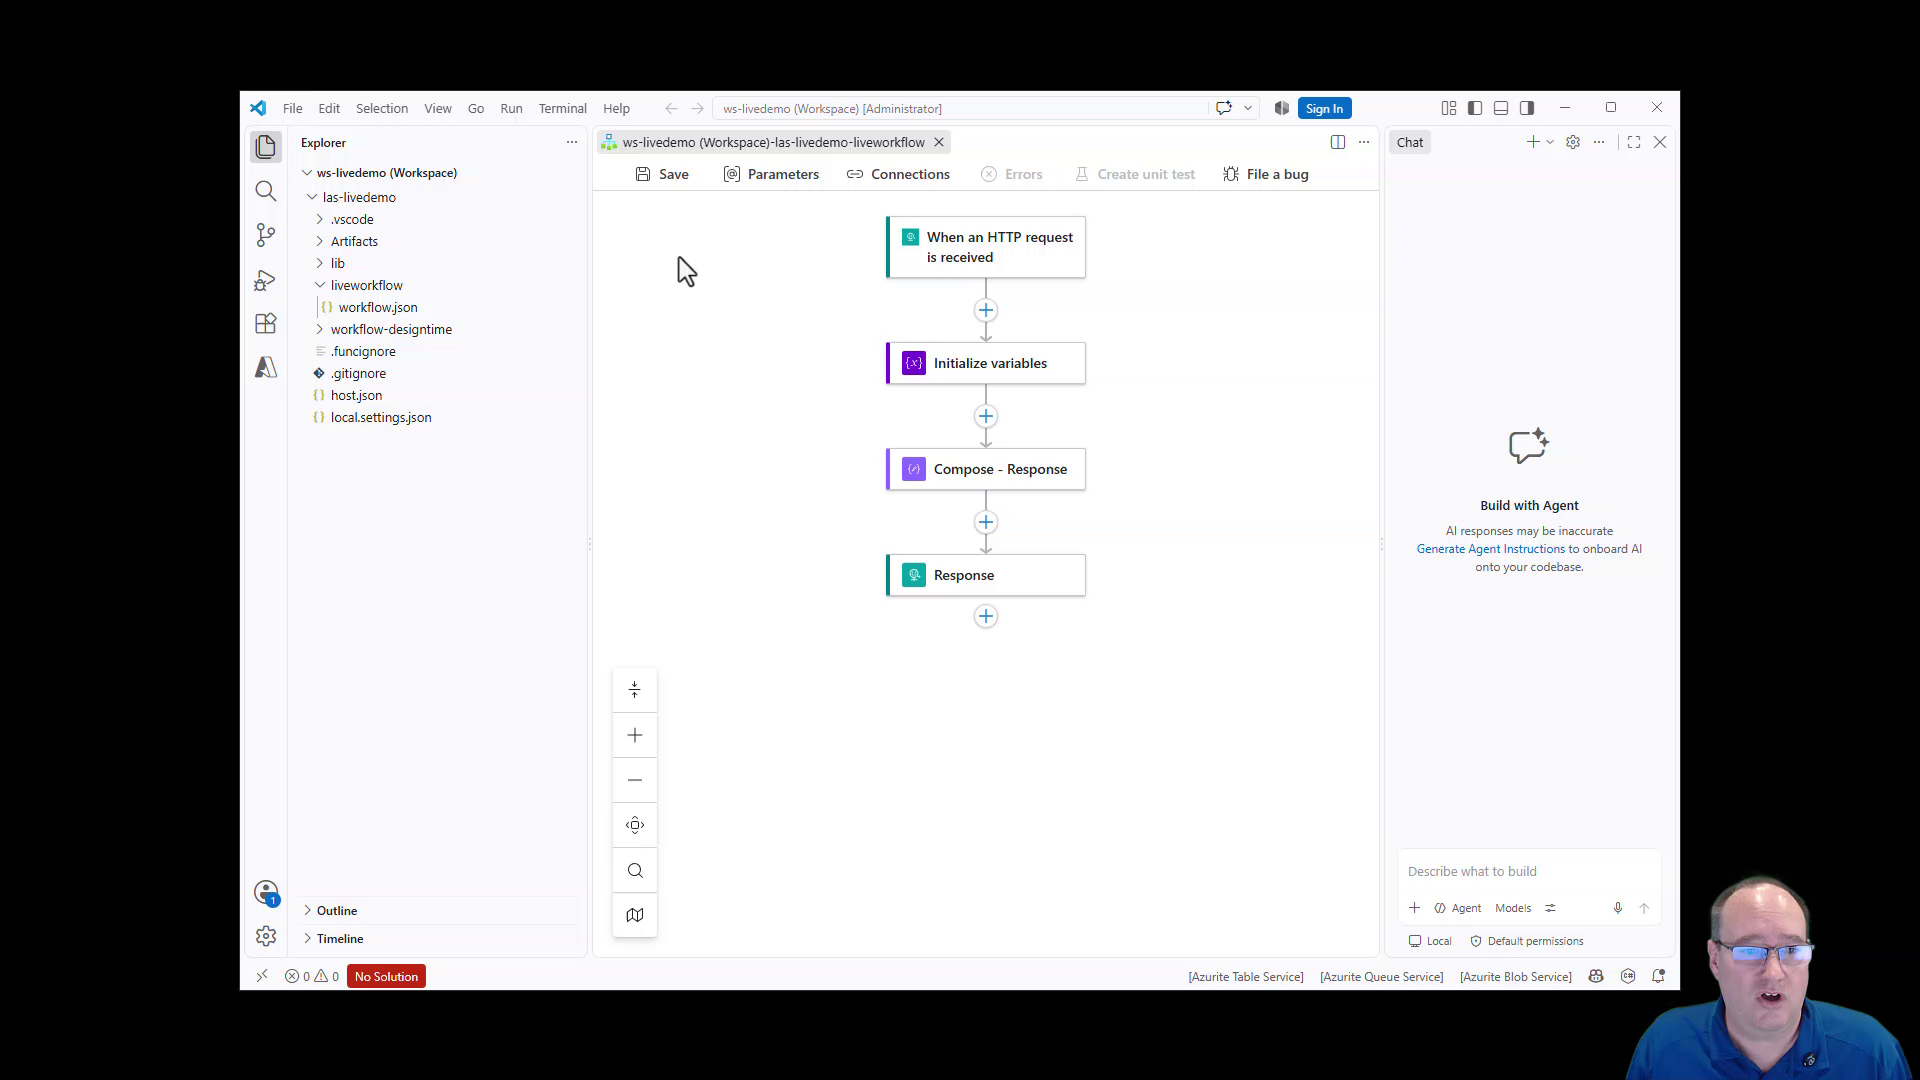
Name actions before referencing their outputs. It makes the dynamic-content choices easier to identify. Then select Save in the designer. I've lost edits by closing the designer without saving, so this is a step I make a point of checking.
Run locally and send a request
Press F5 to start the local debugging session. Wait for the host and storage emulators to finish starting. Right-click workflow.json, choose Overview, and copy your workflow's callback URL.
In Postman, create a POST request with that URL. Select Body → raw → Text, enter a short message, and choose Send. The recording uses:
Hi! This is a live demo.The response shown in the demo is:
The input was Hi! This is a live demo.Use the URL generated on your own machine, including its query string. Treat it as a credential because it includes a signature. Keep it out of shared screenshots and public source control.
Back in VS Code, open the run in Run History. Inspect each operation's inputs and outputs to see how the request became the response.
Pause execution with a breakpoint
- Stop the current debugging session.
- Double-click
workflow.jsonto open the JSON editor. - Set a breakpoint in the gutter at the Compose action.
- Press F5 again and resend the request from Postman.
- When execution pauses, inspect Locals and the available workflow context in Run and Debug. Continue execution to let the response complete.
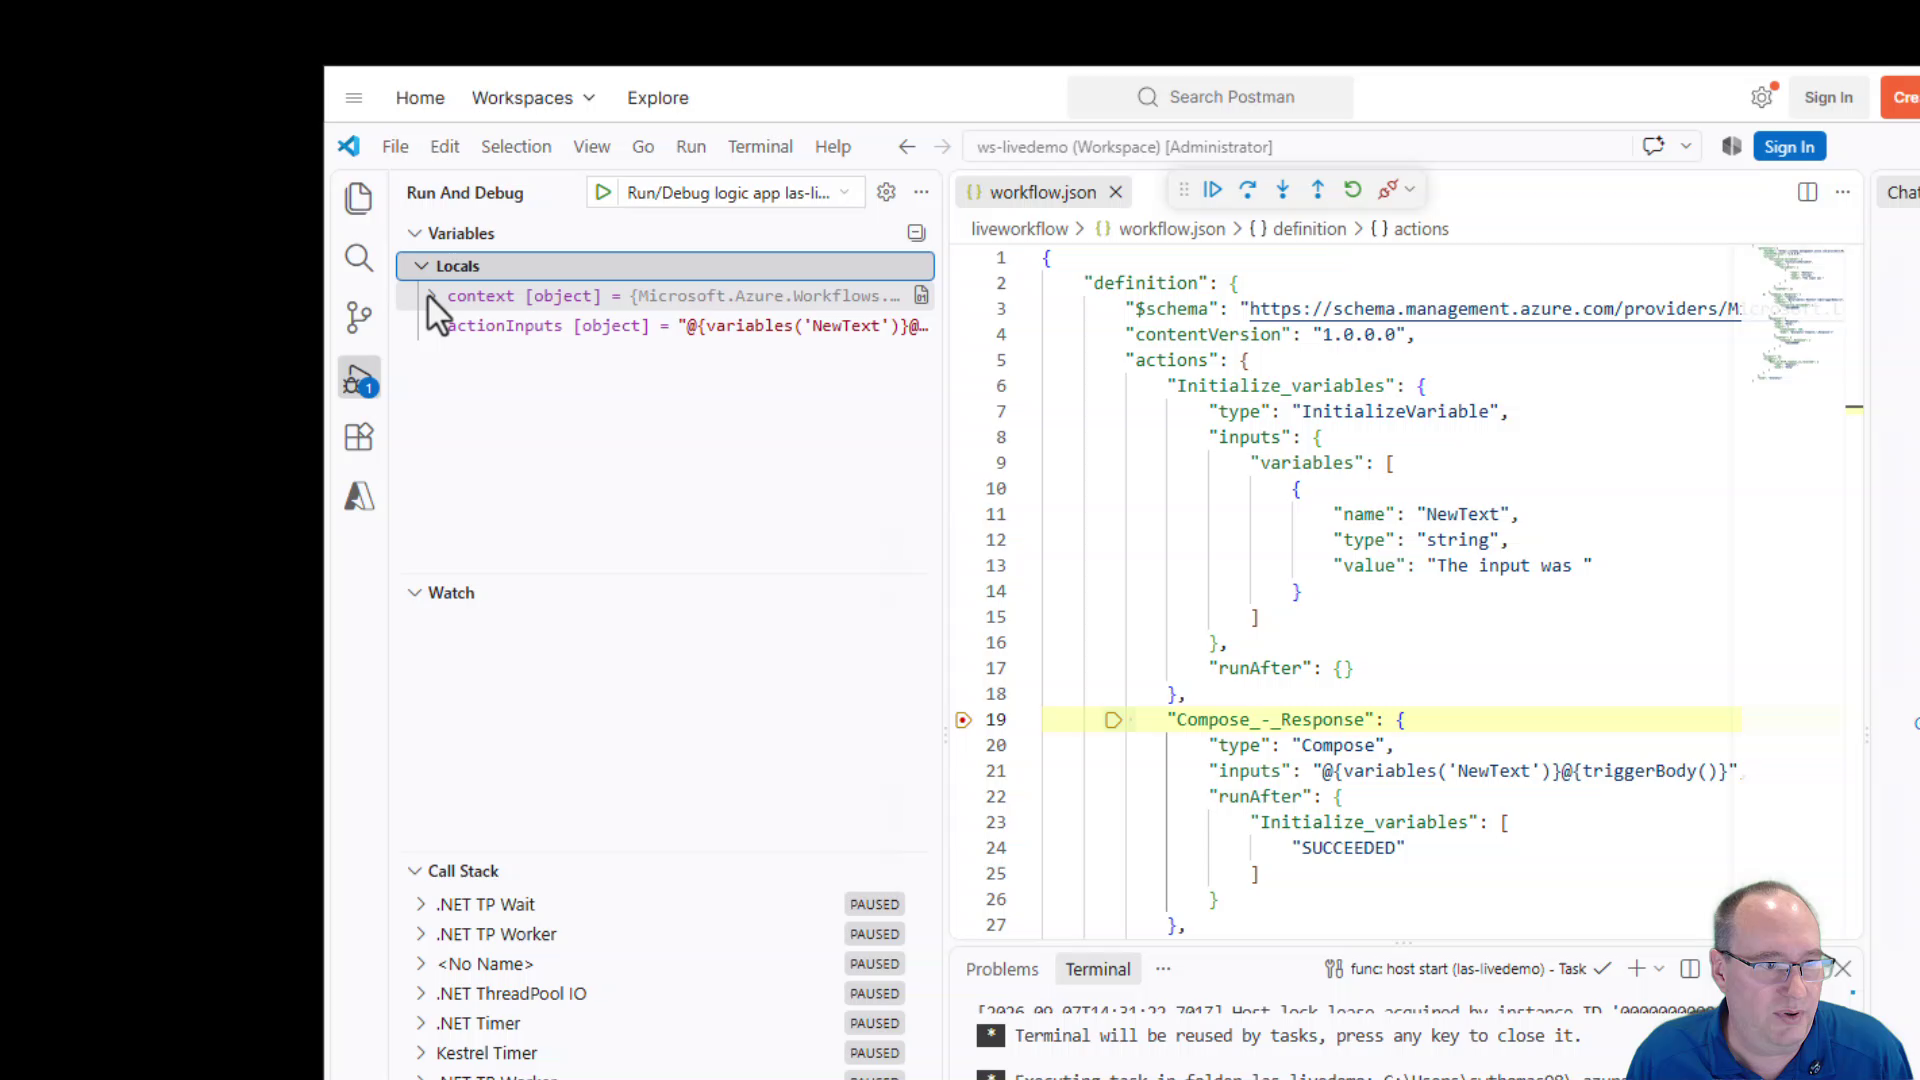
A request waiting in Postman can be expected while you've paused the workflow at a breakpoint. Check VS Code before treating that delay as a failed request. The same local debugging approach is useful when you later add supported custom C# code to a workflow.
If your first run doesn't work
- The designer doesn't show your latest changes: check that you saved the workflow in the designer.
- The local host doesn't start: review the VS Code terminal and installation notifications. Confirm the dependencies and Azurite services are ready.
- The HTTP request fails: confirm the host is running and copy the current callback URL from Overview again.
- A connector asks for Azure configuration: check that you've selected the built-in operations used here. Managed connectors need additional Azure setup.
Once this request-and-response workflow runs, try changing the Compose input and inspecting the next run. For workflows that need Azure connections, continue with my guide to local connection settings for Logic Apps Standard. More tutorials are in the Azure Integration Services learning hub.