Does your test or production Azure application still use a default URL like my-app-v2-random-numbers.azurewebsites.net?
While functional, these default domains can look unprofessional and make it harder for users (or client applications) to trust and remember your service.
In this guide, I’ll walk you through the exact steps to add a Custom Domain (like yourname.com) and a Free Managed SSL Certificate to an existing Windows App Service. And better yet – it’s SO EASY to set up! Even if you have no DNS or Domain Name experience.
Note: Although I demonstrate this using an Azure Logic App, this exact process works for Azure Web Apps, Azure Functions, and any standard Windows App Service plan.
Why Do This?
By default, Azure provides a long, generic domain name. Configuring a custom domain allows you to:
- Professionalize your brand: Move from
azurewebsites.nettoyourcompany.com. - Simplify access: Easier to type and remember.
- Secure your endpoint: Azure provides free managed certificates for custom domains (or you can bring your own)

Prerequisites
Before we start, ensure you have:
-
An active Azure App Service (Web App, Logic App, or Function App).
-
A domain name registered (e.g., via GoDaddy, Namecheap, or Cloudflare).
-
Access to manage the DNS records for that domain.
Step 1: Initiate Custom Domain Setup in Azure
First, log in to the Azure Portal and navigate to your App Service.
- On the left-hand menu, scroll down to Settings and select Custom domains.
- Click + Add custom domain.
- For “Domain Service,” select All other domain services (since we are managing DNS externally).
- For “Certificate type,” select App Service Managed Certificate. This is a great free feature from Azure.
- For “TLS/SSL type,” choose SNI SSL.

Azure Portal Add Custom Domain
Step 2: Adding a Root Domain (e.g., whyclouds.com)
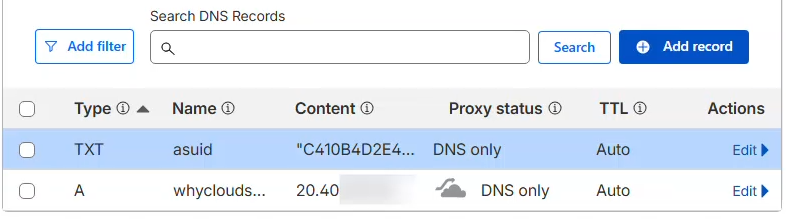
If you want to map your root domain (like whyclouds.com), enter it in the “Domain” field. Azure will provide you with two specific records you need to create in your DNS provider:
-
A Record: Points your domain to the App Service IP address.
-
TXT Record: Used by Azure to verify you own the domain.
Configuring DNS (Cloudflare Example)
Switch to your DNS provider. In this example, I am using Cloudflare.
- Create an A Record pointing
@(root) to the IP address provided by Azure. - If you are using CloudFlare, uncheck the Proxy status (turn it from Orange Cloud to Grey Cloud/DNS Only). I am only using pure DNS resolution for the verification to pass. I have not tested it with this enabled.
- Create the TXT Record with the host
asuidand the value provided by Azure.
Cloudflare DNS Root Setup
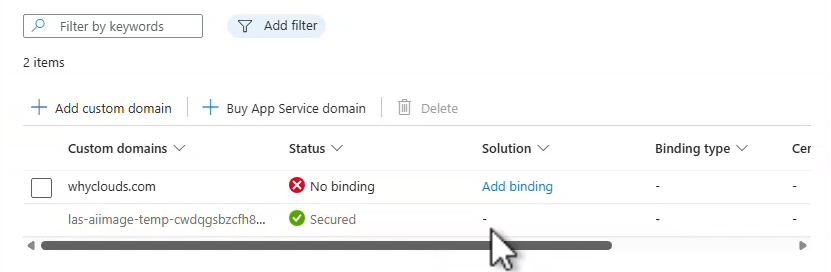
Step 3: Validation and SSL Binding
- Go back to the Azure Portal and click Validate.
- Once you see green checkmarks, click Add.
- Azure will now create the domain resource. This might take a moment.
- Once added, you will see a notification to “Add Binding.” Click Add binding to generate and assign the SSL certificate.
- Click Validate and then Add.
Note: The certificate issuance process can take 3–5 minutes. Be patient!
Add SSL Azure Portal Binding
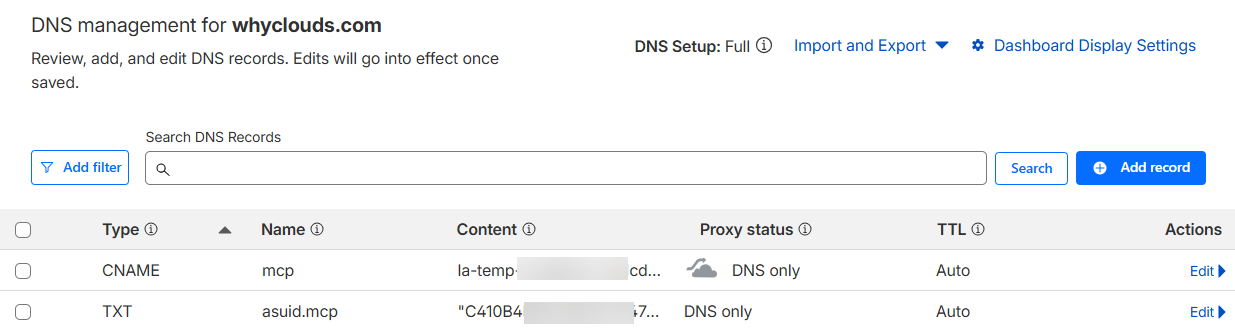
Step 4: Setting Up a Subdomain (e.g., mcp.whyclouds.com)
The process for a subdomain (like mcp.whyclouds.com) is slightly different.
- In Azure, click Add custom domain again.
- Enter your full subdomain (e.g.,
mcp.whyclouds.com). - Azure will ask for a CNAME Record and a TXT Record.
- In your DNS provider:
- Create a CNAME for your subdomain (e.g.,
mcp) and point it to your default Azure domain (myapp-as-setup.azurewebsites.net). - Create a TXT Record for
asuid.subdomain(e.g.,asuid.mcp) using the verification key. - Validate and bind the certificate just like you did for the root domain.
Cloudflare DNS Setup
Conclusion
And that’s it! You have replaced a long, ugly Azure URL with a professional, secure custom domain. Whether you are building an internal tool or a public-facing API, this small change makes a massive difference in how your application is perceived.
If you found this guide helpful, check out the full video tutorial above!
Recent Comments